
Portfolio – Cinewhoop 2.5″ esp32-s3 fpv drone
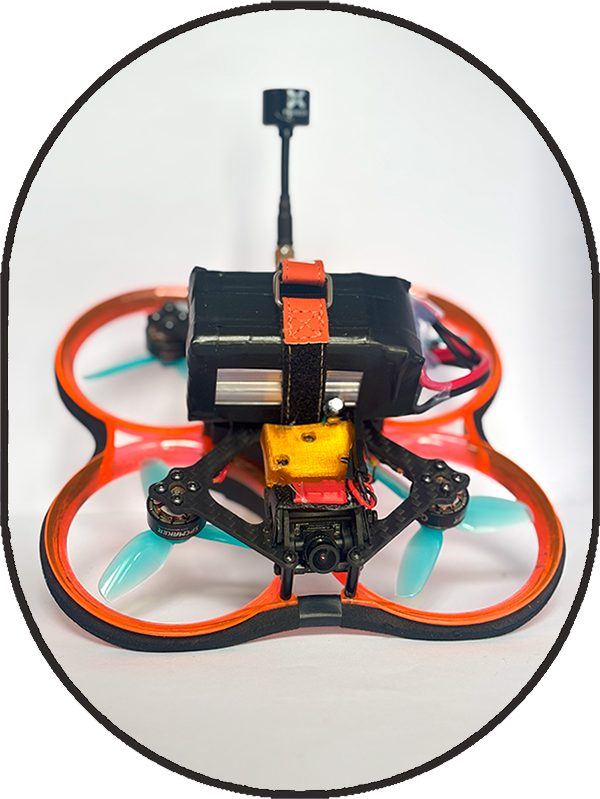
Project intro
This drone marks the switch to a new, more powerful microcontroller: the ESP32.
The transition was triggered by hitting the flash memory limit of the Arduino Nano, which caused upload failures due to insufficient memory. Moving forward, the ESP32 will be the microcontroller of choice for my medium-term projects, thanks to its extraordinary capabilities.
The ESP32-S3 features a dual-core 240 MHz processor, 8 MB of flash memory, and 512 KB of SRAM, a massive leap compared to the Arduino Nano’s 16 MHz AVR processor, 32 KB flash, and 2 KB SRAM. Notably, ESP32-S3 GPIO pins are highly flexible, allowing almost any pin to function as UART, ADC, PWM, etc. These features make it ideal for complex drone projects.
The switch to ESP32 required major adjustments throughout the codebase. During this process, I also introduced several new features and improvements, which are detailed below.
The results are incredible; loop times cut to a third, simultaneous motor control, and low-latency RC response, all of which allow this drone to deliver a smoother, more stable, and undeniably punchier flight experience — a true leap forward in micro drone performance.
Key Concepts
Below are the new key concepts introduced with this drone. For foundational drone concepts like stabilization, gyroscope, accelerometer, and barometer functionality, I recommend reviewing the previous projects in my portfolio.
Switch to ESP32-S3 Zero – A major upgrade from Arduino, the ESP32-S3 features 8 MB flash and a 240 MHz dual-core processor, significantly improving performance. This upgrade boosted the loop frequency from 3 ms to 1 ms in Acro and Angle modes, and from 10 ms to 3.5 ms in Horizon mode.
Note: The ESP32-S3 requires more attention to pin selection, especially bootstrap pins, which should be handled carefully or left unused. Datasheet linked at the bottom.
Wi-Fi Capabilities – The ESP32 enables wireless code upload and telemetry. Using SoftAP, I created a private Wi-Fi network to which my PC connects. This allows for:
OTA (Over-The-Air): Enables wireless firmware upload
Telnet: Used for flight data logging
To support both USB and Wi-Fi logging, I modified the CustomSerialPrint class to switch between Serial prints (USB connected) and Telnet prints (Wi-Fi connected). Since Telnet can slow down loop cycles, I implemented a Buffer class that stores flight data during flight and sends it only after landing. The drone must though maintain Wi-Fi connection, and the buffer is limited by heap size—if full, older data is overwritten.
Improved Motor Control with LEDC PWM – On Arduino, I used a timer interrupt to control motors sequentially, which took up to 8 ms to loop through all four motors. On ESP32, with LEDC PWM, each motor gets its own channel, enabling simultaneous control. Result: 4x faster, much more responsive control.
Used IBUS Receiver for Lower Latency – Switched from PPM (20 ms latency) to IBUS (7 ms latency), resulting in smoother, more precise control.
Smart ESC Calibration and Wi-Fi Switch – Added smart features to control ESC calibration and Wi-Fi toggle via RC input. Uses Preferences (instead of EEPROM) to retain settings across power cycles.
Improved Battery Voltage Monitoring – Enhanced voltage sensing with a refined resistor network and a Zener diode for pin protection. Carefully calculated resistor values ensure safe current to the ESP32. Now, the buzzer reliably triggers when the 4S battery hits 14V.
Components
Cinewhoop 2.5” frame
MPU6050 GY-86
ESP32 S3 Zero as flight controller
4-in-1 ESC Blheli-S
2 BEC with 5 volt and 9 volt output
Camera and VTX
4 Brushless Motors
Active Buzzer
IBUS Receiver

Sources:
The original code can be found on GitHub.
The modified code can be downloaded here.
For the electronic circuit schematics click here.
For the 3d printed parts click here.
For the first code to upload via USB to enable OTA click here.
For ESP32 S3 pins overview guidelines click here – we can use freely all the white pins.